
Desserts
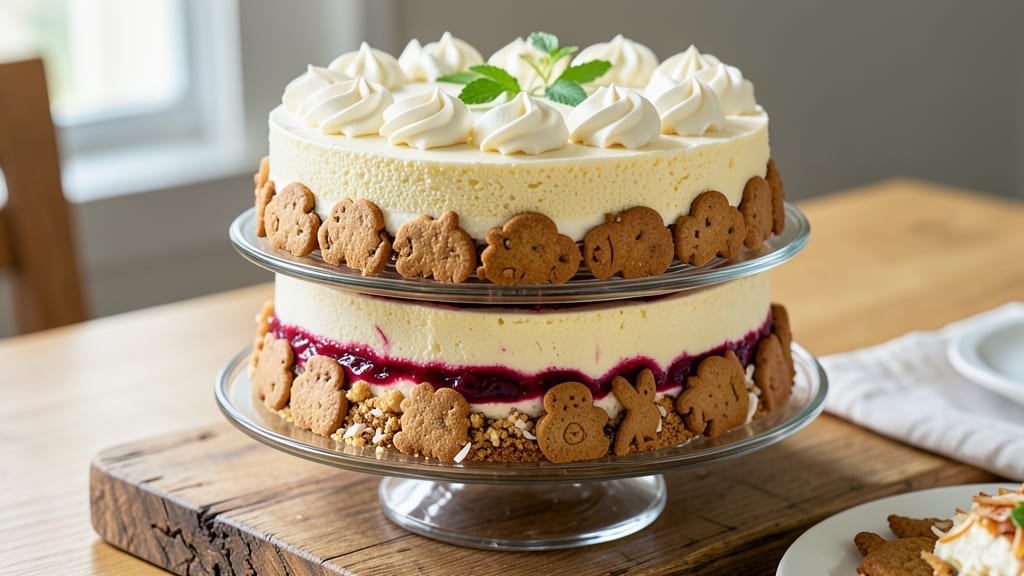
This animal cookie cheesecake recipe delivers the perfect balance of crunchy cookie crown and velvety vanilla filling, with playful animal shapes that make it a showstopper. 🌟 The key lies in a buttery cookie crumb topping that stays crisp even after baking, while the cheesecake filling stays ultra-smooth with no cracks.
I’ve tested this recipe countless times to ensure the layers hold together beautifully—no soggy bases or crumbly fillings here.
The secret to success starts with a foolproof crust made from crushed animal-shaped cookies (or classic Oreo crumbs for a shortcut), mixed with melted butter and a touch of brown sugar for extra caramel depth.
While that bakes, the cheesecake filling gets whipped to perfection with sour cream and vanilla, then poured into the crust before a gentle water bath bake. This method guarantees a creamy, jiggly center every time.
What makes this recipe truly special is the animal-themed decorating—whether you use cookie cutters for the crust, fondant for 3D animals, or edible prints for playful designs.
The contrast between the golden cookie crown and pale vanilla filling creates a visually stunning dessert that’s as fun to assemble as it is to eat. Each bite delivers that perfect crunch-to-creamy transition, making it a crowd-pleaser for any occasion.
Perfect for birthdays, holidays, or just because, this cheesecake is easy to customize with your favorite animal shapes or colors. Let’s get baking!
Ingredients for animal cookie cheesecake
Twelve playful ingredients transform into a showstopping dessert with crunchy animal cookie crowns and velvety vanilla layers!
| Ingredient | Amount | Notes |
|---|---|---|
| Animal-Shaped Cookies 🍪 | 3 cups | Crushed into fine crumbs (or Oreo crumbs) |
| Unsalted Butter 🧈 | ¾ cup | Melted, full-fat for richness |
| Granulated Sugar 🍚 | ½ cup | For cookie crumb mixture |
| Light Brown Sugar 🍚 | ¼ cup | Packed, for caramel depth |
| Large Eggs 🥚 | 4 whole | Room temperature for smooth filling |
| Full-Fat Sour Cream 🥛 | 1 cup | Full-fat for ultra-smooth texture |
| Vanilla Extract 🌿 | 2 tsp | Pure, high-quality vanilla |
| Cream Cheese 🧀 | 32 oz | Room temperature, full-fat |
| Granulated Sugar 🍚 | 1 ½ cups | For cheesecake filling |
| All-Purpose Flour 🌾 | 2 tbsp | For stabilizing filling |
| Lemon Juice 🍋 | 1 tbsp | Fresh, for tangy balance |
| Vanilla Bean Paste 🌿 | 1 tbsp | Optional, for deeper flavor |
| Heavy Whipping Cream 🥛 | 1 cup | For cookie crown topping |
| Powdered Sugar 🍚 | ½ cup | For cookie crown dusting |
| Edible Animal Shapes 🦁 | 1 package | For decorating (fondant or prints) |
The cookie crumbs are the star—animal-shaped cookies add whimsy, but Oreo crumbs work in a pinch. For the best texture, crush them finely in a food processor (not a blender!). Trader Joe's has the best selection of animal cookies, but any fun-shaped variety does the trick. The butter matters here—unsalted, full-fat gives that rich, caramel depth. Don't skip the brown sugar—it's what makes the crust stay crisp after baking. Pro tip: toast your cookie crumbs lightly before mixing with butter to deepen the flavor.
No animal cookies? Classic Oreo crumbs are a foolproof shortcut—just make sure to use the classic variety, not the dark chocolate or other flavors. Running low on vanilla? Vanilla bean paste is worth the splurge for that restaurant-quality depth, but pure extract works fine too. The cream cheese needs to be room temperature—this is non-negotiable for a smooth filling. If you're in a hurry, microwave it for 20 seconds in 10-second bursts. For the cookie crown topping, heavy whipping cream
This cheesecake keeps beautifully—4-5 days in the fridge covered tightly. The cookie crown stays crisp for about 2 days, so make it fresh if you're serving it as the centerpiece. For make-ahead baking, assemble the crust and filling a day ahead, then bake just before serving. The animal decorations? Fondant shapes are the most fun, but edible prints on top of the cream cheese layer work too. Store any leftovers with parchment between layers to keep that perfect crunch.
Why You'll Love This Recipe
- No-Bake Magic: I swear by this—just crush cookies, mix cream cheese, and let it chill. No oven, no stress, no waiting for the kitchen to cool down. That’s right, the animal cookies (the ones with the little ears or paws) add this unexpected crunch that makes every bite feel like a little celebration.
- Creamy Crunch Combo: The brown sugar caramelizes just enough to balance the buttery richness of the cheesecake layer, while those crushed animal cookies? They’re the star—adding a nostalgic, slightly sweet crunch that disappears too fast. Honestly, I’ve never met a cheesecake that didn’t need this textural upgrade.
- Party in a Bowl: Between us, this is my go-to for birthday parties, holiday gatherings, or even a "just because" dessert night. The animal cookies make it feel special without requiring fancy plating—just scoop and serve. (Yes, even on a Tuesday night when the kids beg for something fun.)
- Leftovers? Even Better: The best part? It tastes just as good the next day—if there is a next day. I’ve wrapped portions in parchment and frozen them for last-minute guests, and no one ever complains. Plus, using store-bought animal cookies keeps it budget-friendly without sacrificing that "made-with-love" vibe.
Step-by-step instructions for animal cookie cheesecake
Here's how to build layers of dreamy cheesecake and crunchy cookie crowns—every bite is pure magic!
👨🍳 Step 1: Make the Cookie Crumb Crust
Preheat your oven to 350°F and spread the 3 cups animal-shaped cookies on a baking sheet. Toast them for 5-7 minutes until fragrant and lightly golden. Watch closely—they'll burn fast!
While still warm, pulse the toasted cookies in a food processor until you get fine crumbs (like sand). In a large bowl, mix these crumbs with the 0.75 cup melted unsalted butter, 0.5 cup granulated sugar, and 0.25 cup packed light brown sugar. Press this mixture firmly into the bottom of a 9-inch springform pan, creating an even layer. Bake for 10 minutes to set the crust. Here's the thing—don't skip pressing it down tight, or your cheesecake will leak later!
🍳 Step 2: Prepare the Ultra-Smooth Cheesecake Filling
In a separate large bowl, beat the 32 oz cream cheese and 1.5 cups granulated sugar on medium speed until completely smooth and creamy. I like to use a hand mixer for this—it's faster than a stand mixer and less messy. Scrape down the sides occasionally to keep things moving.
Add the 4 room-temperature large eggs one at a time, mixing just until each is incorporated. Then stir in the 1 cup full-fat sour cream, 2 tsp vanilla extract, 1 tbsp lemon juice, and 1 tbsp vanilla bean paste (if using). Fold in the 2 tbsp all-purpose flour last—this helps stabilize the filling and prevents cracking. Pour this batter over the pre-baked crust and smooth the top with a spatula.
⏰ Step 3: Bake the Cheesecake to Perfection
Place the springform pan in a water bath—wrap the bottom in heavy-duty foil first, then place it in a larger pan and fill the outer pan with hot water (about halfway up the springform). Bake at 325°F for 55-65 minutes until the edges are set but the center still jiggles slightly. Don't overbake—you want that silky texture!
Turn off the oven, crack the door open, and let the cheesecake cool inside for 1 hour. Then remove it from the water bath and cool completely at room temperature. This gradual cooling prevents cracks. I know it's tempting to rush, but patience here makes all the difference for that perfect slice!
🥘 Step 4: Create the Cookie Crown Topping
Whip the 1 cup heavy whipping cream and 0.5 cup powdered sugar to stiff peaks. Fold in the 3 cups crushed animal-shaped cookies gently with a spatula until just combined. Spread this mixture evenly over the completely cooled cheesecake, creating a thick, crunchy layer.
Use the 1 package edible animal shapes to decorate the top while the cream is still soft. Press them gently into the cream so they stick. Let the cheesecake set in the fridge for at least 4 hours (overnight is best) before slicing. The longer it chills, the firmer the cookie crown gets!
Pro Tips For Making Animal Cookie Cheesecake
- Crumble First, Then Toast: Dump those animal cookies into a food processor and pulse just until they’re fine crumbs—no floury dust. Then spread them on a baking sheet in a single layer and toast at 325°F for 8–10 minutes. I used to skip this step, and the crust always tasted raw and sad. Trust me, the extra 10 minutes makes the difference between "meh" and "wow."
- Melt Butter Slowly: Warm the butter with the sugars over low heat, stirring constantly, until it’s just melted—not bubbling. If you rush it, you’ll scorch the sugars and end up with a bitter, caramelized mess. I learned this the hard way when my first attempt smelled like a campfire instead of cookies.
- Room-Temp Eggs Only: Take those eggs out of the fridge at least 30 minutes before mixing. Cold eggs won’t blend smoothly, and you’ll end up with lumps that ruin the silky texture. I was skeptical until I tried it—now I swear by it. No one wants a cheesecake with eggy surprises.
- Water Bath Mandatory: Wrap that cheesecake pan in foil before placing it in the water bath, and use enough hot water to come at least halfway up the sides. Skimping on the water bath leads to cracks and uneven baking. Yes, it’s a pain to set up, but it guarantees a creamy center and no sad, rubbery top.
Storing and reheating this animal cookie cheesecake
Refrigerator Storage
Once your animal cookie cheesecake is fully chilled and decorated, store it in an airtight container with parchment paper between layers to preserve that perfect crunch. Keep it refrigerated at 40°F or below for up to 4-5 days.
The cookie crown stays crisp for about 2 days, so I recommend making it fresh if you're serving it as the star dessert. 🥧
Freezer Storage
For longer storage, wrap the cheesecake tightly in plastic wrap, then place it in a freezer-safe bag with all the air squeezed out. Label it with the date and freeze for up to 3 months.
When ready to serve, thaw it in the fridge overnight. The texture remains creamy, though the cookie crown may lose some crispness after freezing. 🧊
Reheating Slices
If you're reheating individual slices, I recommend serving them straight from the fridge for the best texture. If needed, warm them in the microwave for 10-15 seconds on 50% power to soften the cheesecake slightly while keeping the cookie crown intact.
Avoid oven reheating—it can make the cookie topping soggy. 🔥
Reviving Crunch
If your cookie crown loses its crunch after storage, sprinkle the top with powdered sugar and let it sit for 10 minutes to absorb moisture. For extra crispiness, broil the cheesecake for 1-2 minutes at 350°F—just watch it closely to avoid burning.
This works especially well for slices that have been stored for a few days. ✨
Make-Ahead Tips
Assemble the crust and filling a day ahead, then bake just before serving. Once fully chilled, add the cookie crown topping and decorate with animal shapes. This way, your dessert looks fresh and festive without the last-minute rush. Store any extra toppings separately and add them just before serving. 🦁
Serving Leftovers
Slice the cheesecake with a hot knife for clean cuts, especially if it's been refrigerated. Serve with a dollop of whipped cream or a drizzle of caramel sauce to complement the animal-themed design.
Leftovers keep well in the fridge, so it’s perfect for meal prep—just reheat slices gently to maintain that perfect balance of crunch and creaminess. 🍴
Nutrition facts
Frequently asked questions
Can I use regular cookies instead of animal-shaped ones?
While animal-shaped cookies add fun visual appeal, classic Oreo crumbs or any crushed cookies work perfectly for the crust and cookie crown. The key is crushing them finely for that ideal texture. For extra flavor, try chocolate chip or gingerbread cookies—they'll add a delicious twist to your dessert.
Why did my cheesecake crack?
Cracking usually happens from sudden temperature changes or overbaking. To prevent this, always cool your cheesecake gradually by turning off the oven and letting it sit inside for 1 hour before removing. Also, make sure your eggs and cream cheese are room temperature—this helps create a smooth, stable filling.
How do I decorate with animal shapes without them falling off?
Press the animal decorations gently into the cream cheese layer while it's still soft but set. For extra hold, use a tiny dab of edible glue or melted chocolate as an adhesive. Let the cheesecake chill completely before serving to ensure everything stays in place. Fondant shapes work best for 3D designs.
Can I make this cheesecake in a different pan size?
Yes, but adjust baking times accordingly. For an 8-inch pan, reduce the recipe by about 25% and bake for 45-55 minutes. For a 10-inch pan, increase by 25% and bake for 65-75 minutes. Always use a water bath and check doneness with a toothpick—it should come out with a few moist crumbs, not liquid.
What's the best way to serve this dessert?
Slice with a hot knife for clean cuts, especially if chilled. Serve with fresh berries, whipped cream, or a drizzle of caramel sauce to complement the animal theme. For a party, arrange slices on a platter with matching animal-themed decorations for a cohesive look.